Overview
When troubleshooting issues on Quectel Pi H1, one of the most useful tools available is the Serial Console.
Unlike HDMI, SSH, VNC, or remote desktop access, the Serial Console remains available even when:
-
The display is not working
-
The network is unavailable
-
SSH cannot be accessed
-
The system fails to boot completely
For this reason, the serial console is often the first tool used by developers and support engineers when diagnosing system issues.
According to the Quectel Pi H1 documentation, the serial console is primarily used to:
-
View system logs
-
Execute commands
-
Perform debugging
-
Access the system when the graphical interface is unavailable
Why Use the Serial Console?
The serial console provides direct access to the Linux console and boot logs.
Typical use cases include:
-
Investigating boot failures
-
Capturing kernel logs
-
Troubleshooting display issues
-
Verifying driver initialization
-
Recovering access when SSH is unavailable
-
Collecting information for technical support
Hardware Requirements
Before using the serial console, prepare the following:
-
Quectel Pi H1
-
USB-to-TTL serial adapter (3.3V)
-
USB cable
-
PC running Windows or Linux
-
Terminal software (PuTTY, MobaXterm, Tera Term, etc.)
Hardware Connection
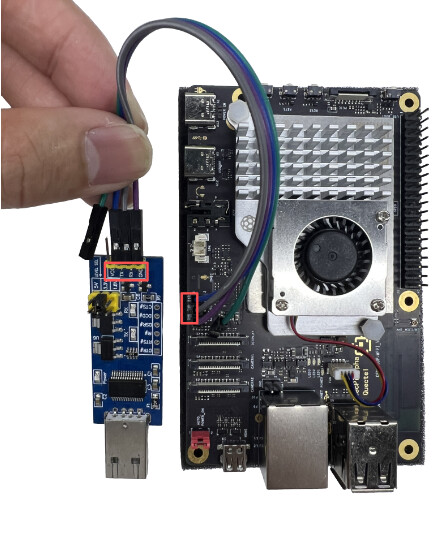
 Ensure the board is powered off before making any serial connections.
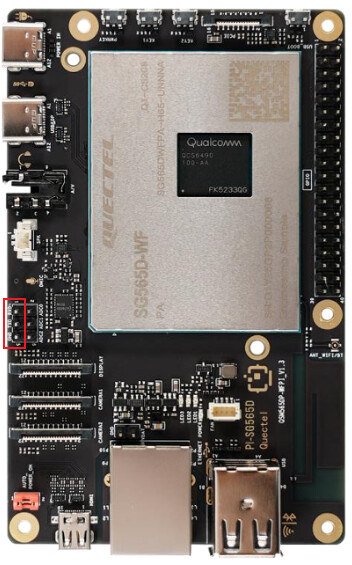
Connect the pins as follows:
| Quectel Pi H1 | USB-TTL Adapter |
|---|---|
| DBG_TXD | RXD |
| DBG_RXD | TXD |
| GND | GND |
The USB-TTL adapter should be configured for 3.3V operation.
Identifying the Serial Port
After connecting the USB-TTL adapter to the PC:
-
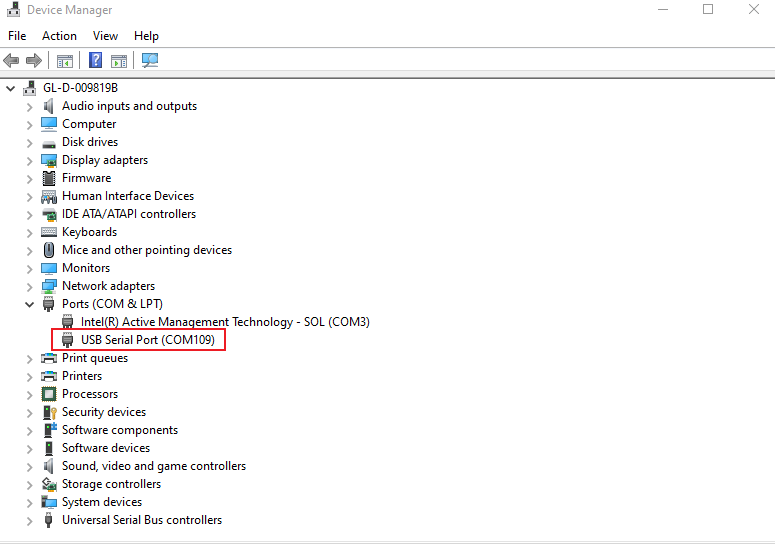
Open Device Manager.
-
Locate the newly detected COM port.
Example:
USB-SERIAL CH340 (COM5)
Connecting with MobaXterm
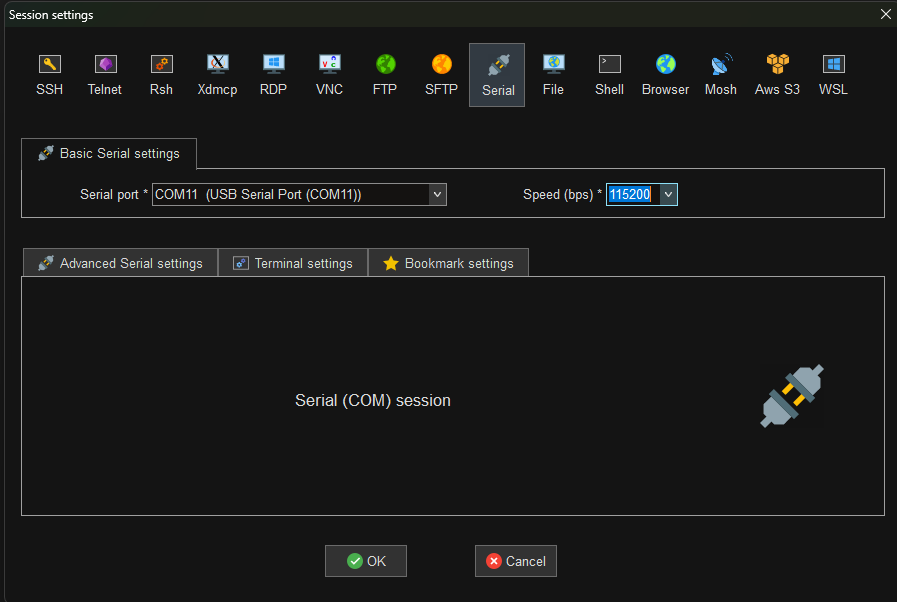
Launch MobaXterm and create a new Serial Session.
Recommended settings:
| Parameter | Value |
|---|---|
| Serial Port | COMx |
| Baud Rate | 115200 |
| Data Bits | 8 |
| Stop Bits | 1 |
| Parity | None |
| Flow Control | None |
Click OK to connect.
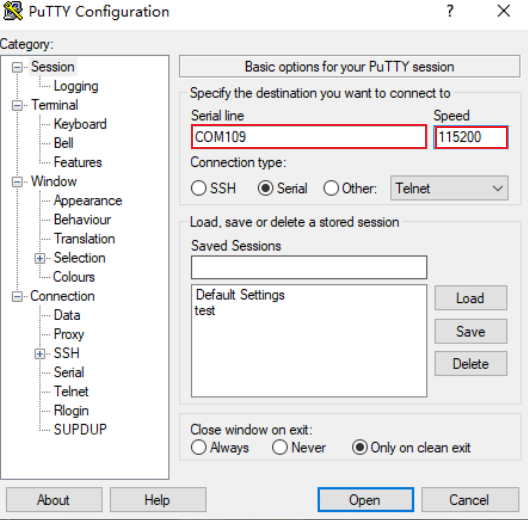
Connecting with PuTTY
If using PuTTY:
-
Select Serial
-
Select the correct COM port
-
Configure baud rate to:
115200
- Click Open
Logging In
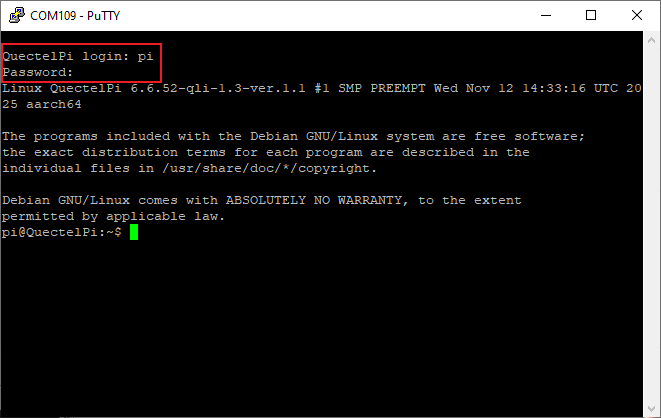
After the board boots:
-
Press Enter
-
Enter the username
-
Enter the password
After successful login, a shell prompt should appear.
Example:
debian@quectel:~$
The serial console can now be used for diagnostics and troubleshooting.
Capturing Boot Logs
One of the most valuable uses of the serial console is capturing boot logs.
Simply power on the board while the serial terminal is connected.
You will see messages similar to:
U-Boot ...
Linux version ...
Starting kernel ...
These logs help identify:
-
Boot failures
-
Driver loading issues
-
Storage initialization problems
-
Display initialization failures
-
Kernel panics
Common Troubleshooting Scenarios
Scenario 1 – HDMI Black Screen
Symptoms:
-
Board powers on
-
HDMI monitor remains black
The HDMI guide recommends checking:
-
Power connection
-
HDMI cable connection
-
System startup status
-
Display resolution compatibility
Using the serial console allows verification that:
-
Linux booted successfully
-
Display drivers loaded correctly
-
GNOME or display services started successfully
If the board is booting normally via serial console but HDMI remains blank, the issue is likely display-related rather than a system boot failure.
Scenario 2 – System Does Not Fully Boot
Symptoms:
-
No desktop appears
-
No SSH access
-
LEDs appear active
Using the serial console allows observation of:
-
Kernel startup messages
-
Service initialization
-
Error messages
-
Login prompt availability
If boot messages stop unexpectedly, the last visible message often identifies the failing component.
Scenario 3 – Network Connectivity Issues
When troubleshooting Ethernet connectivity, the Ethernet guide recommends checking:
ifconfig
route -n
cat /etc/resolv.conf
These commands can be executed directly through the serial console even when remote access is unavailable.
Scenario 4 – SSH Access Lost After Network Changes
The Ethernet documentation warns that modifying network settings remotely can result in loss of connectivity.
If this occurs:
-
Connect through the serial console
-
Review the network configuration
-
Restore the correct settings
This is one of the most common reasons developers keep a serial cable available during development.
Useful Commands for Diagnostics
View Kernel Messages
dmesg
Save logs:
dmesg > dmesg.log
View System Journal
journalctl
Current boot:
journalctl -b
Check Network Interfaces
ifconfig
or
ip addr
Check Routing Information
route -n
Check DNS Configuration
cat /etc/resolv.conf
Recommended Information When Contacting Technical Support
When reporting an issue, consider providing:
uname -a
cat /etc/os-release
dmesg > dmesg.log
journalctl > journal.log
Along with:
-
Boot log screenshots
-
Serial console screenshots
-
Hardware connection photos
-
Description of the issue
This information helps support engineers investigate the issue more efficiently.
Conclusion
The Serial Console is one of the most powerful debugging tools available on Quectel Pi H1.
Whether troubleshooting display issues, network problems, boot failures, or driver initialization errors, the serial console provides direct access to system logs and diagnostic information when other interfaces are unavailable.
For developers and system integrators, keeping a USB-to-TTL adapter available during development can significantly reduce troubleshooting time and simplify system recovery.